

Getting Started with Azure Virtual Machines - Windows
A step-by-step beginner's guide for deploying a Windows 11 Virtual Machine on Azure


Hey there! If you're new to the cloud, specifically Azure, you must have heard about the word "Virtual Machine" or "VM" as it is fondly called. Stay with me if you want to learn more about VMs on Azure and how you can easily deploy a Windows 11 VM as a beginner on Azure using only the Azure portal.
Introduction
There are several definitions and explanations of a VM but I will try to keep it as simple and short as possible - A virtual machine as the name implies is simply a software-based virtual representation of a physical computer that runs inside of other computers.
Virtual machines have many benefits over traditional computers but the ones that come to mind include how cost-effective they are, the ease and speed at which you can spin them up, and finally being scalable i.e they allow you to add or remove more virtual servers to distribute your workloads thereby increasing the availability and performance of your applications.
You can learn more about VMs from Azure here so let's cut right to the chase and deploy a Windows 11 VM on Azure shall we?
Deploying the VM from the Azure Portal
Of course, you need to sign in to the Azure portal and as a pre-requisite, you must have an active Azure subscription which gives you access to the world of Azure at a cost. However, Microsoft also offers free and trial options, giving you a chance to explore and experiment with Azure before committing to a paid subscription. Create a free trial subscription here with your Microsoft account to get started.
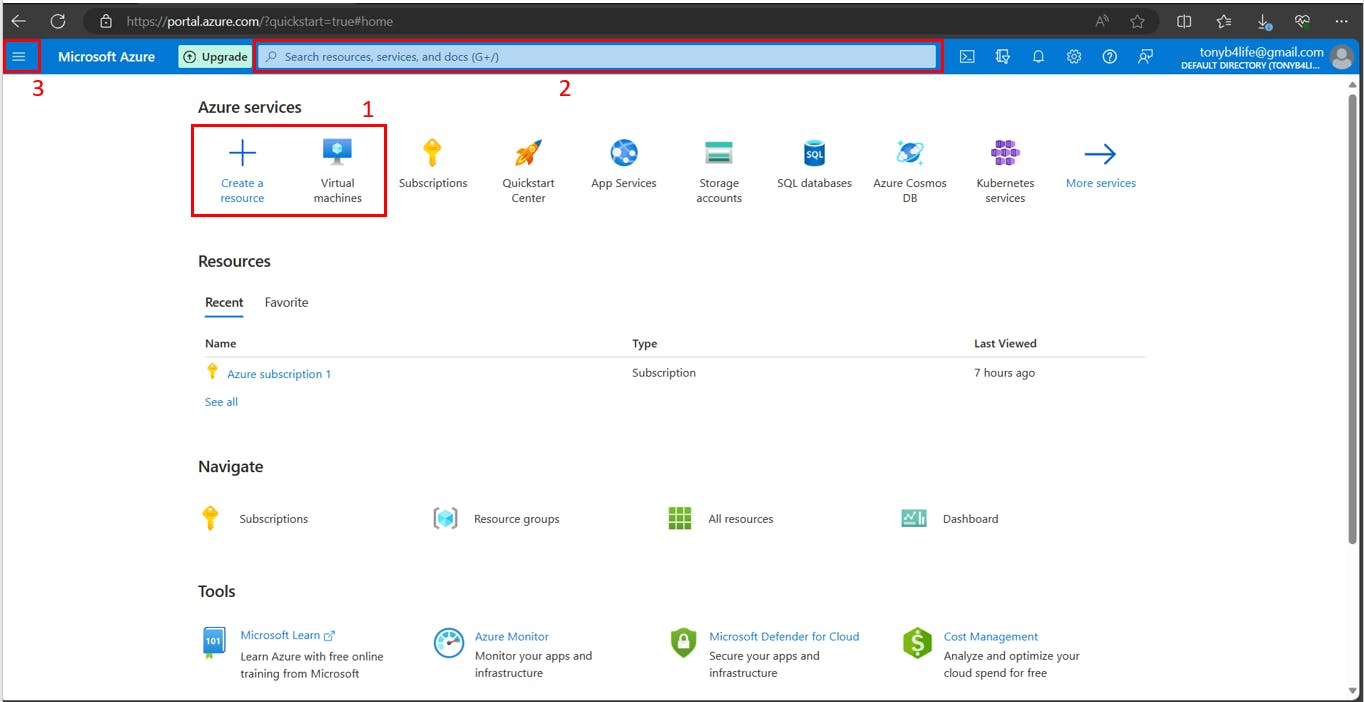
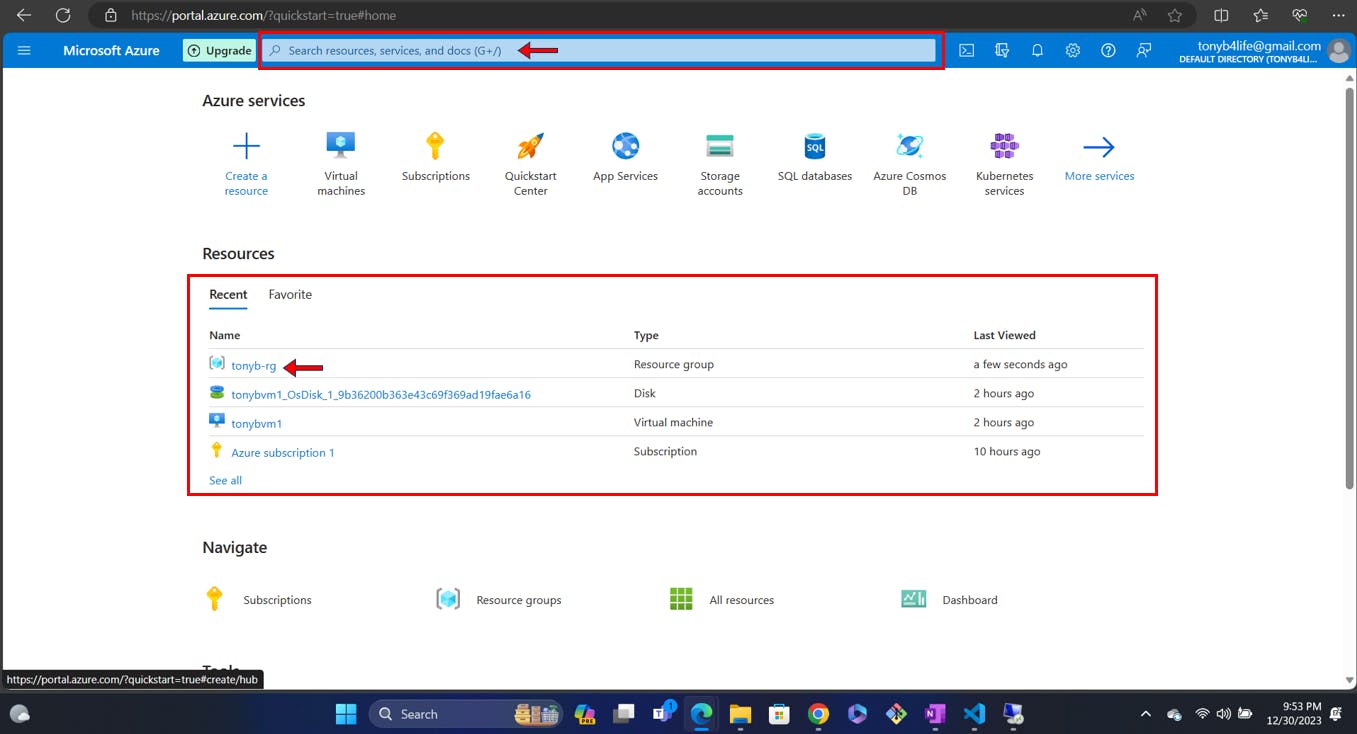
Below is the landing page after signing in to the Azure portal and you can create the VM from any of the options below as shown in the image.
Click on "Create a resource" and then Virtual Machine or by clicking "Virtual machines"
In the search bar, start typing "Virtual Machines" and select it from the search suggestions
Click on the menu button, select "Create a resource" and search for "Virtual Machines"
You will be redirected to the " Basics" page where you will be required to complete the different parameters to enable you to provision the virtual machine that runs Linux or Windows. I have written a guide on how to deploy a Linux virtual machine from this point on. Check it out below.
Moving on, let's go through the tabs and supply the parameters for the Windows VM.
Project Details
In this section, you are to select the subscription and resource group.
As a form of description, Resources are instances of services that you can create, such as virtual machines, storage, and SQL databases. Resource groups are logical containers where you can deploy and manage Azure resources like web apps, databases, and storage accounts. While Subscriptions logically associate user accounts with the resources that they create. Each subscription has limits or quotas on the amount of resources that it can create and use. Organizations can use subscriptions to manage costs and the resources that are created by users, teams, and projects.
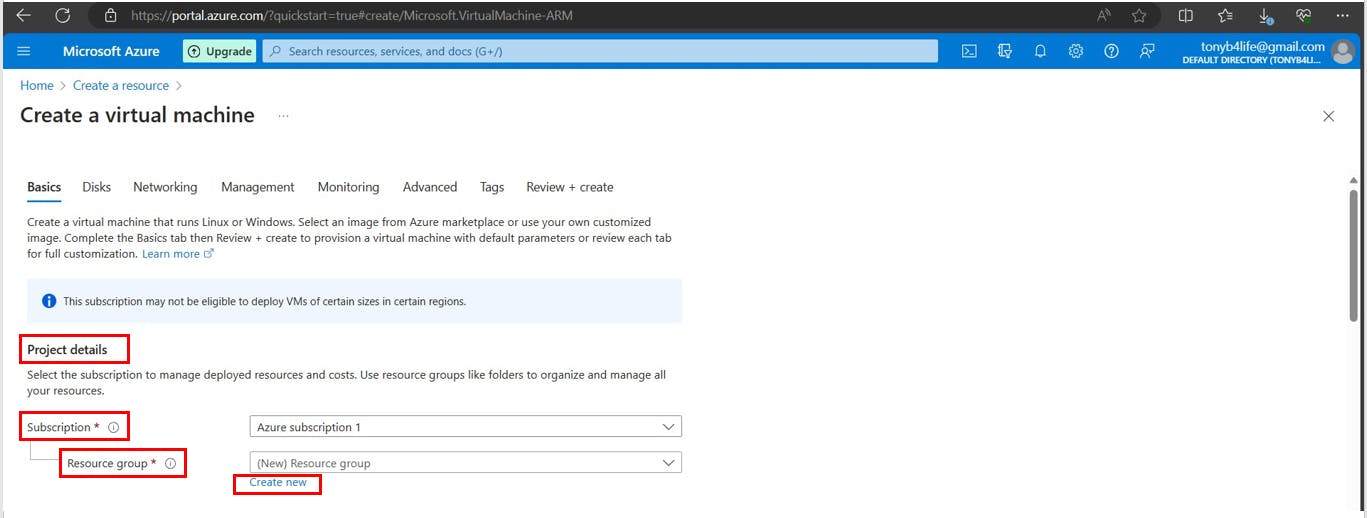
a) Select your preferred subscription in the dropdown
b) Select the preferred resource group in which you would want to deploy your new VM. If you don't have an existing resource group, click "Create new" and enter a valid name for your new resource group. and move on to the next step
Instance Details
In this section, you supply the details of your VM
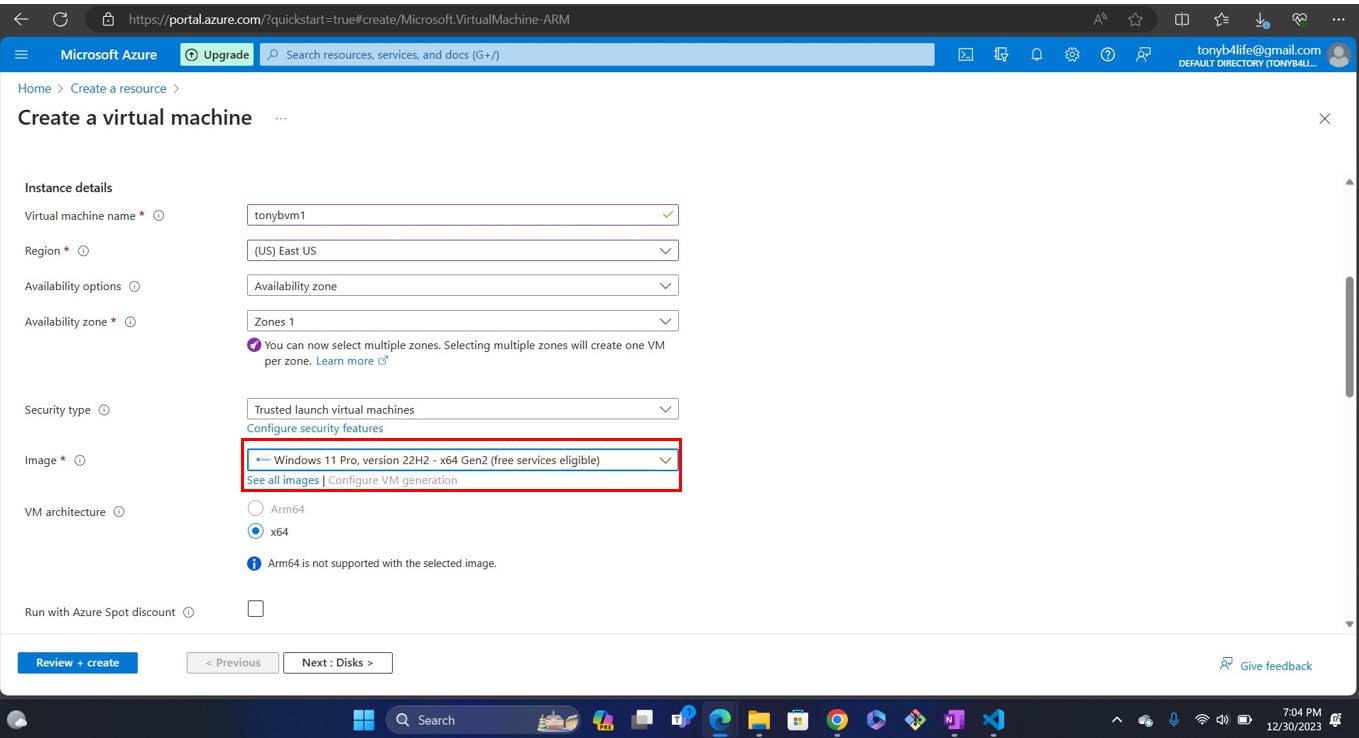
a) Give your virtual machine a suitable name.
b) Select your preferred region: This is simply a geographical area in which one or more physical Azure datacenters reside. Choosing the best Azure region is a function of some key factors such as the compliance and data residency needs, service availability in the region you are considering and of course, the cost.
c) Select your Availability option and then Availability zone(s): Availability zones are separated groups of datacenters within a region that have independent power, cooling, and networking infrastructure designed so that if one zone experiences an outage, then regional services, capacity, and high availability are supported by the remaining zones.
d) Select your preferred Security type which is the level of security you want to be applied to the VM
e) Now very importantly in the image tab, select "Windows 11 Pro" from the dropdown. This is where you choose the base operating system (OS) or application for the VM
f) Select the VM Architecture: x64 is widely used but note that Arm64 also has its benefits.
g) Next in this section is selecting the size of the VM, which determines factors such as processing power, memory, and storage capacity. Take note of the respective cost here as well.
Administrator Account
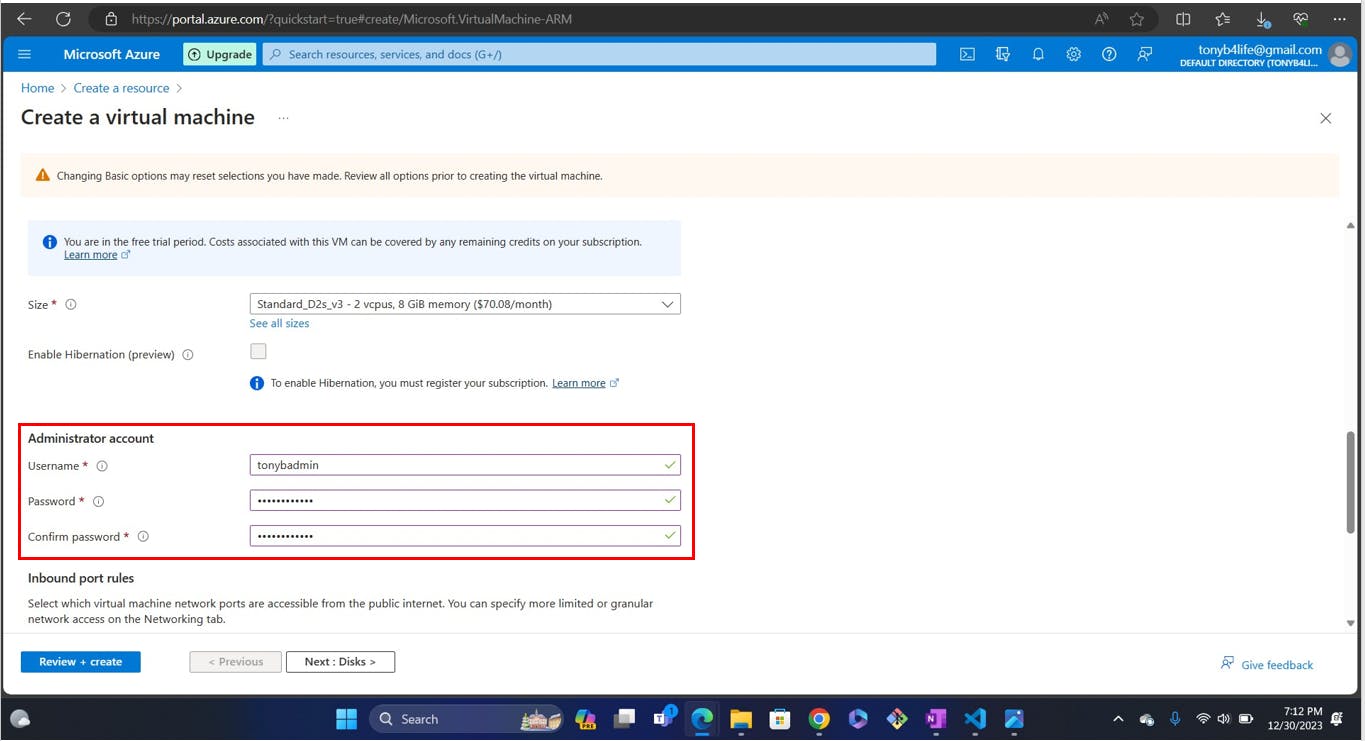
In this section, create the administrator credentials i.e. the username and password that will be used to log in to the VM.
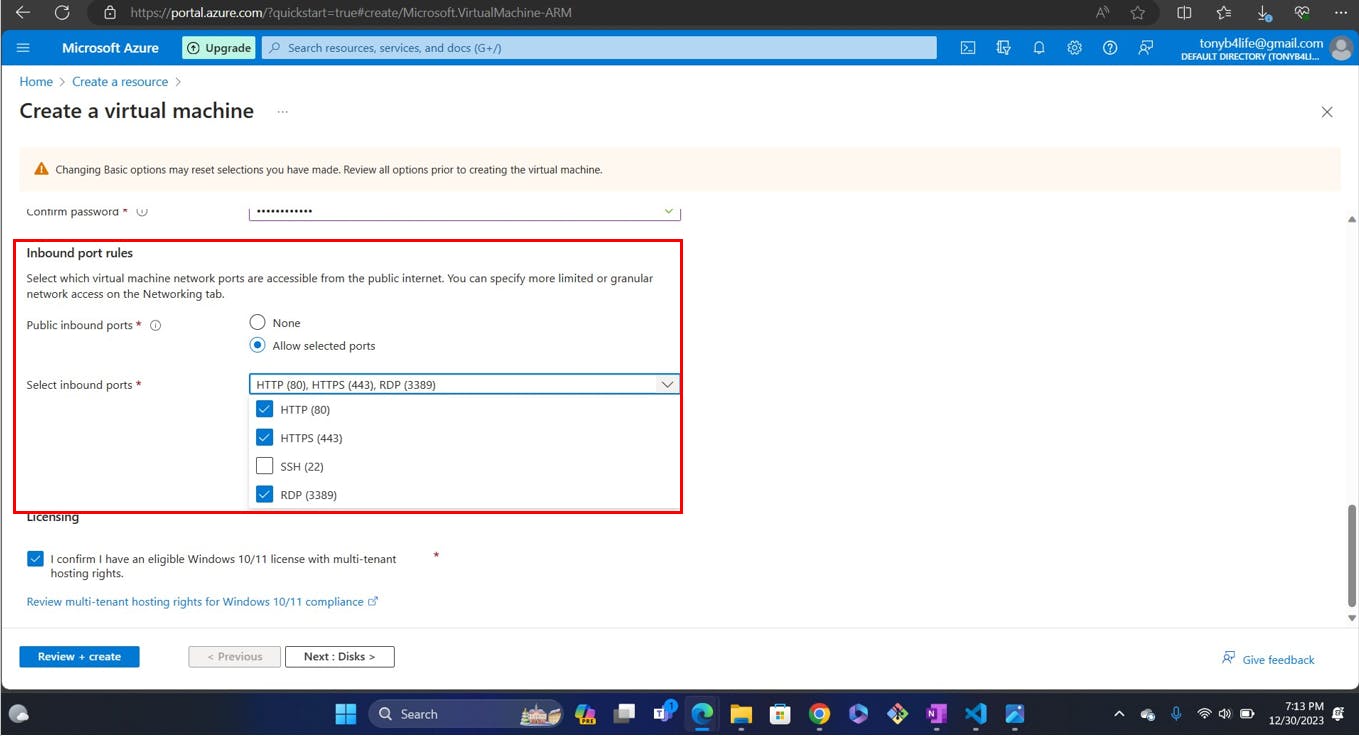
Inbound port rules
By default, access to the virtual machine is restricted only to sources in the same virtual network, and traffic from Azure load-balancing solutions. Select as shown below to allow traffic from the public internet to one of these common ports and then select RDP.
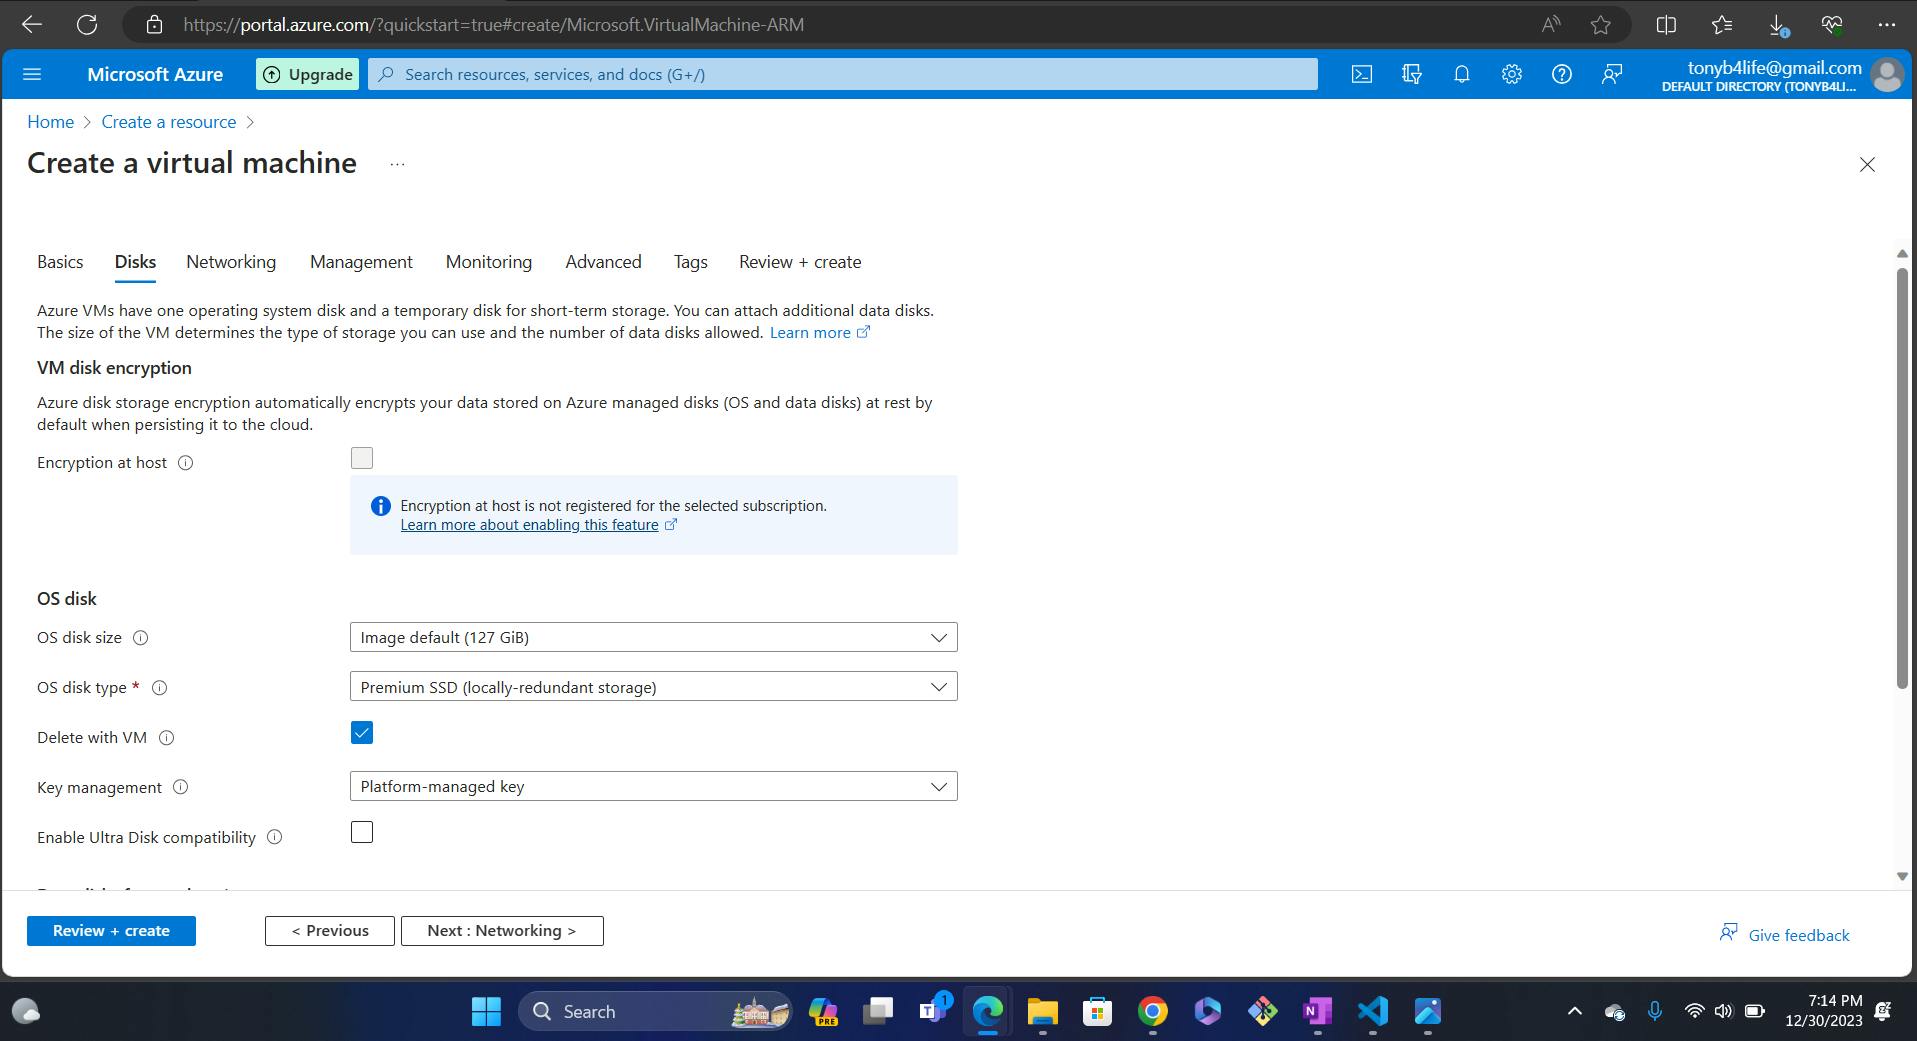
Disks
In this section, select your preferred OS disk size and OS disk type as shown below and leave other tabs as default. Note that you can add and configure additional data disks for your VM or attach existing disks from this section.
Networking
This is where you define network connectivity for your virtual machine by configuring network interface card (NIC) settings. You can control ports, inbound and outbound connectivity with security group rules, or place behind an existing load balancing solution.
Management
In this section, you can configure management options for your VM such as setting up Microsoft Defender for Cloud, system-assigned managed identity, login in with Azure AD and other management options on the tab.
Monitoring
Here, you can configure monitoring options for your VM such as alerts, diagnostics and application health monitoring.
Advanced
If you have any additional configuration, agents, scripts or applications via virtual machine extensions or cloud-init you can configure them all here.
Tags
Tags are metadata elements that you apply to your Azure resources. They're key-value pairs that help you identify resources based on settings that are relevant to your organization. If you want to track the deployment environment for your resources, add a key named Environment. To identify the resources deployed to production, give them a value of Production. The full key-value pair is Environment = Production.
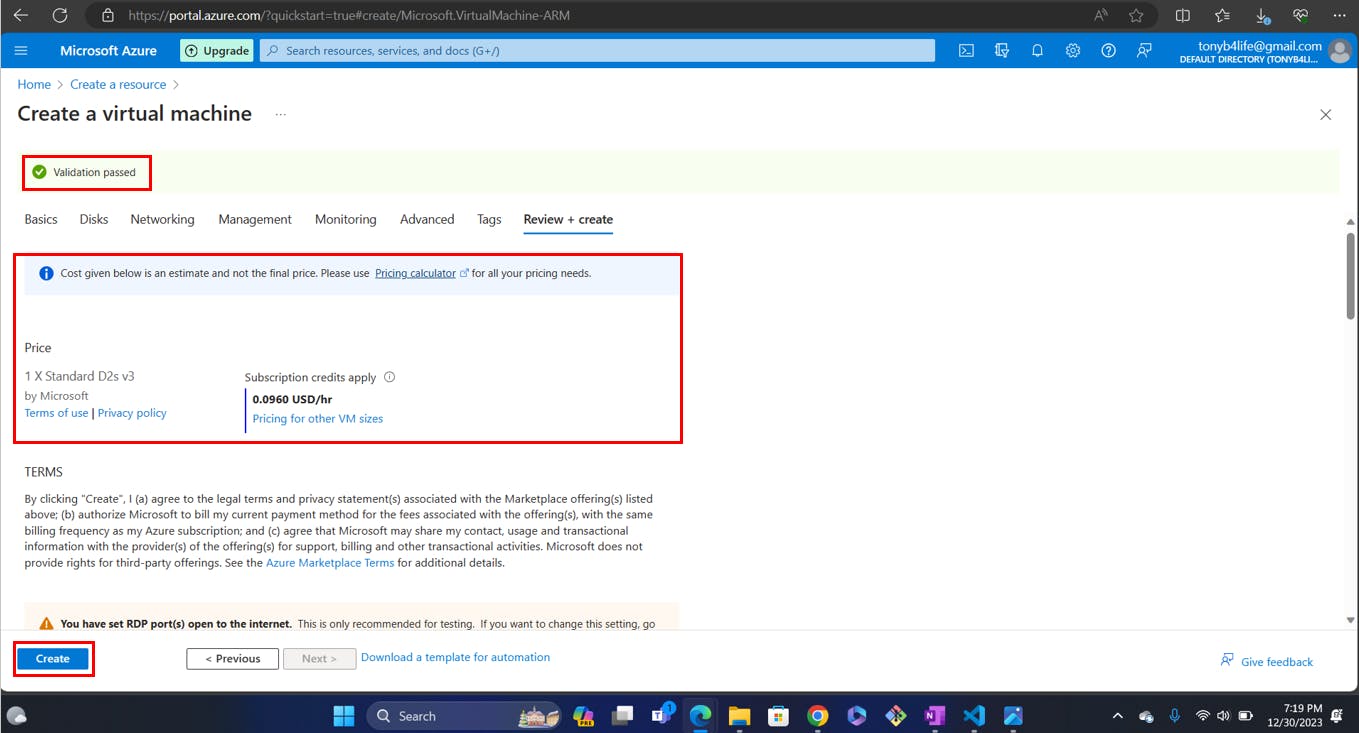
Review + create
Finally, when you are done with all the sections or at any point in time when you are satisfied with your configured options, you can skip to the Review + create tab. This does a general overview of your configuration and lets you know if there are any issues with any of the sections that may impact the successful creation of the VM. You will also get to see an estimate of the cost of your VM. Once the validation is passed as shown below you can then click the "create" button
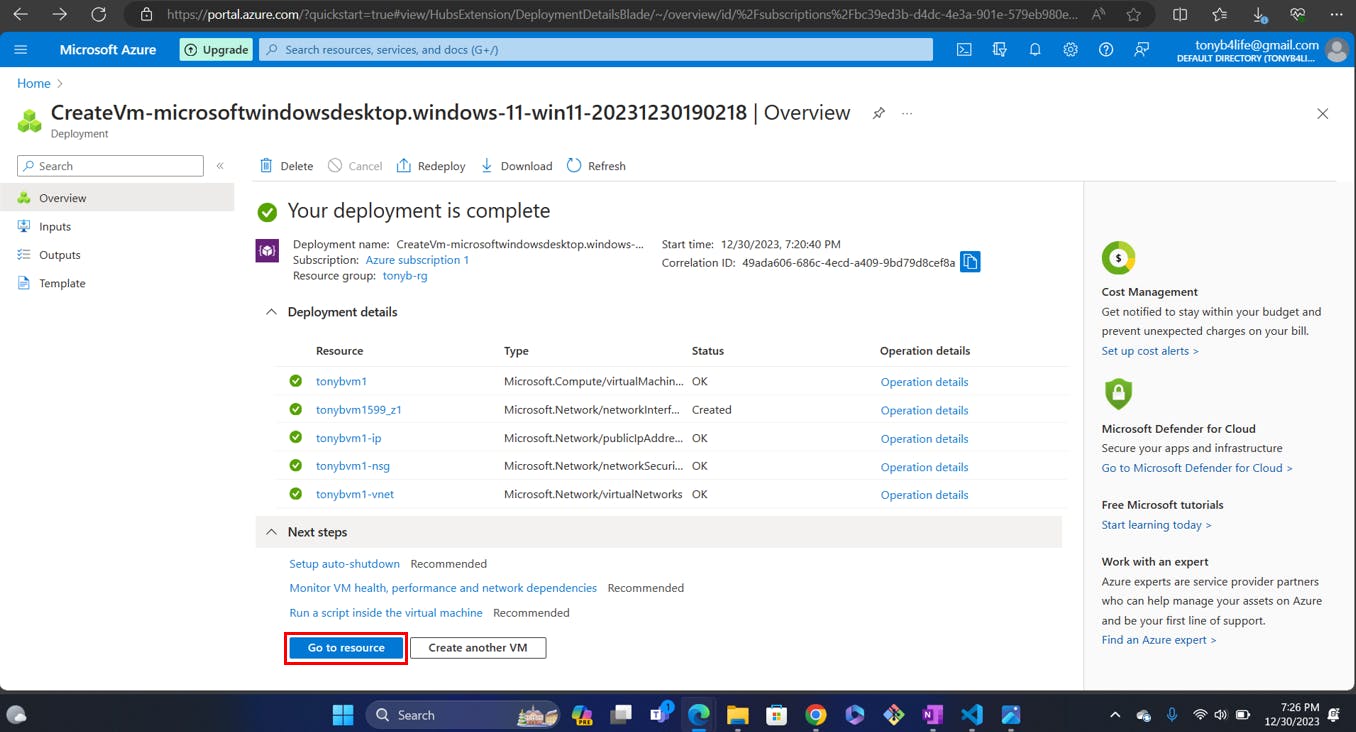
The deployment will take a short while and you can also monitor the progress from the Azure notifications tab. Once the deployment is marked complete your VM is ready and you can click "Go to resource" to check it out and view its properties.
Connecting to your VM
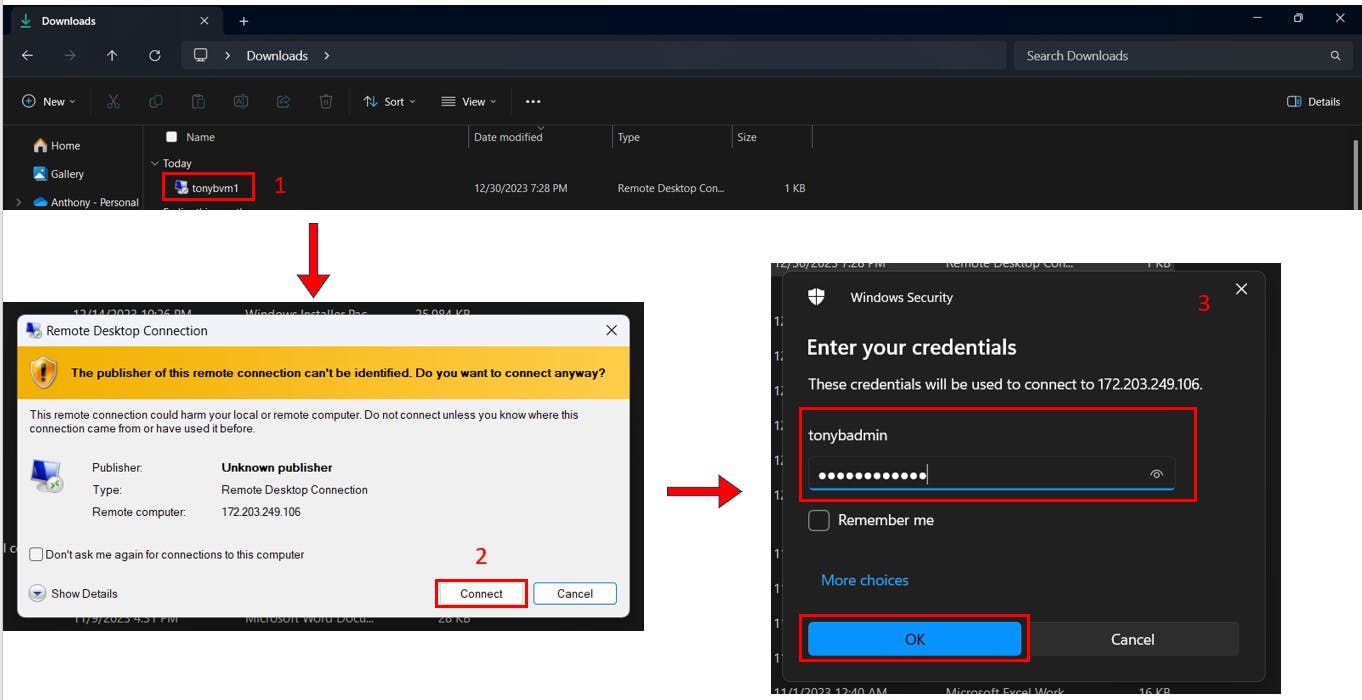
a) On the overview page of your VM click on connect > connect via RDP. There are other ways to connect such as Bastion, Native SSH, and serial console but native RDP is the most popular and that is the option we will be using.

b) Download the RDP file to your local machine and open it, click on connect, enter your admin credentials and click ok.
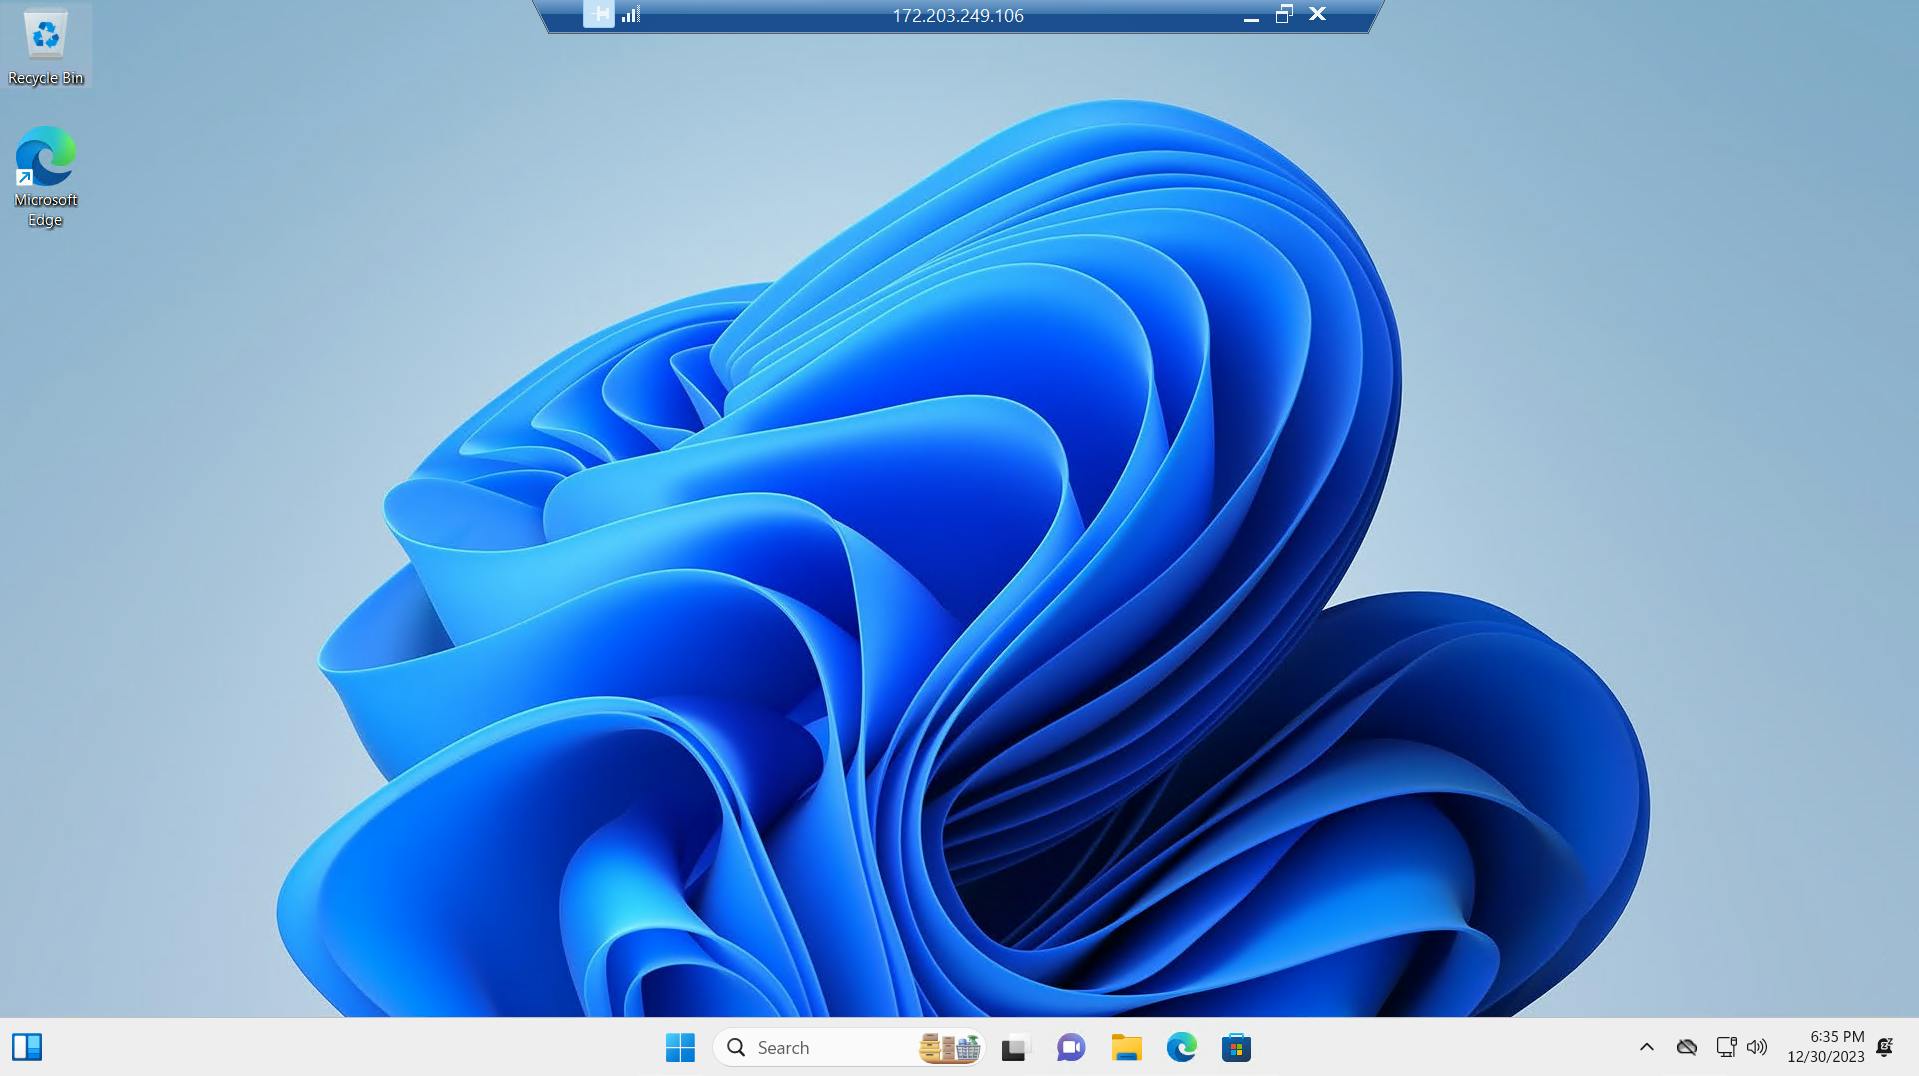
Welcome! You are now connected to your Windows 11 Pro Azure Virtual Machine!
Deleting the VM/Associated Resources
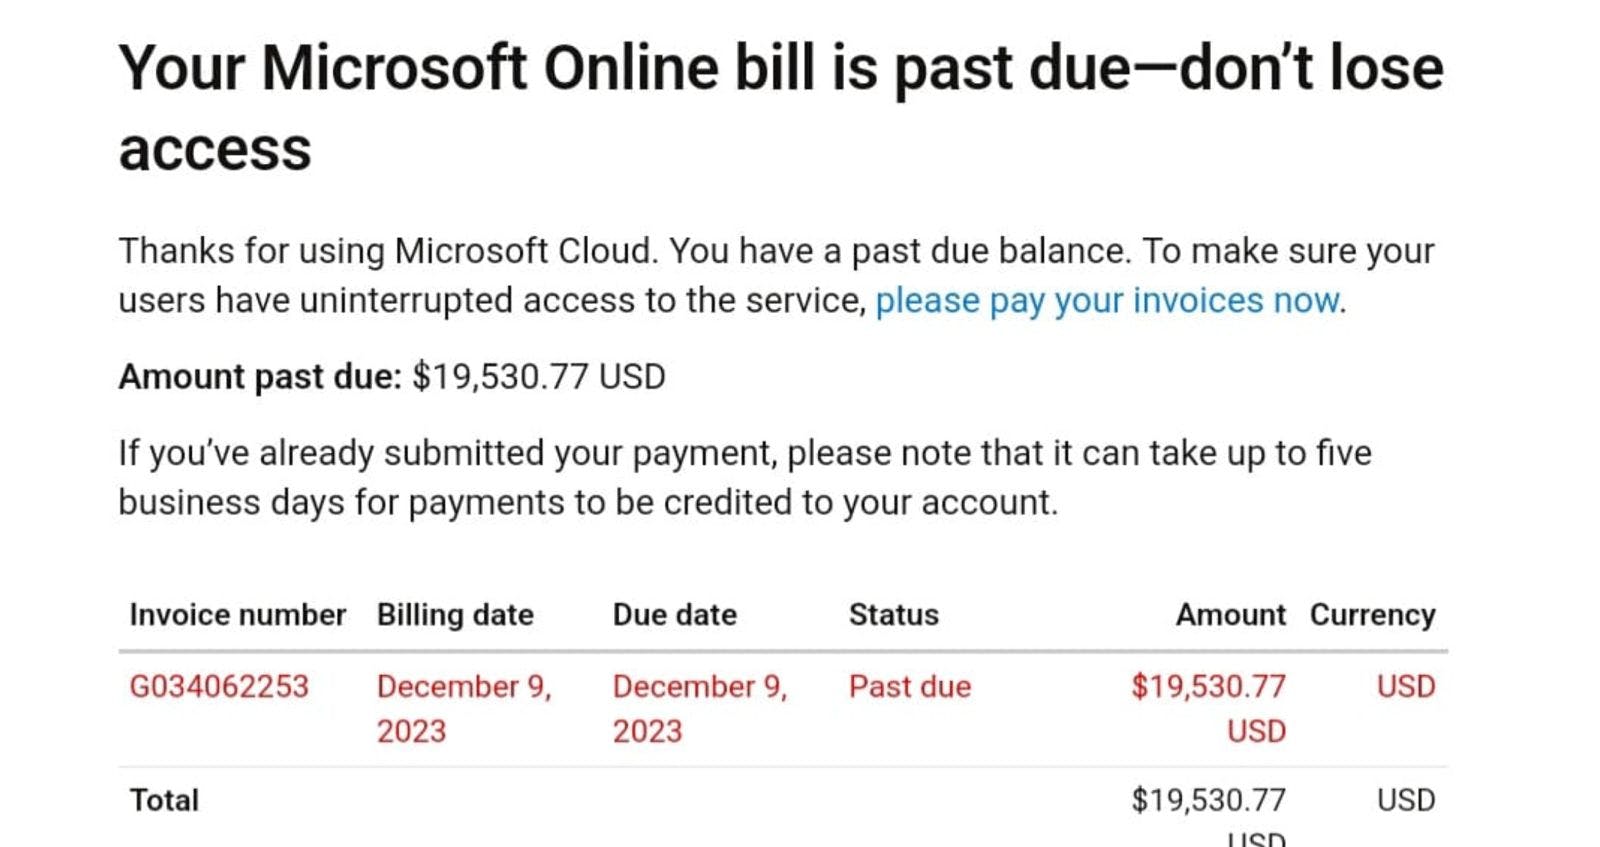
As a form of best practice, it is not cool to leave unutilized resources running on Azure. This is asides the obvious fact that it will incur a lot of unwanted costs for you or your organisation. So we'll quickly go through how to delete the VM and other associated resources before we wrap this up so you don't be like my friend who shared the credentials to his pay-as-you-go subscription with his fellow students and incurred over $19k as his bill in just one month! Unbelievable right? I also laughed so hard when I was told but I'm not joking. "Evidence dey! LOL".
The shortest step to deleting the VM and all other associated resources is by deleting the resource group that contains them.
a) Go to the home page of the Azure portal and select the resource group from the "Recent" tab or type in "resource groups" in the search bar and select the resource group to be deleted.
b) click on "Delete resource group" and check the force delete option.
c) Enter the resource group name to confirm deletion and then finally click delete.

Mind you, deleting resource groups is a tricky one and you should only do that when you are sure there are no dependencies or nothing contained in it will be needed anymore. Learn more about how to delete resource groups and resources here.
To delete only the VM and any other associated resource without deleting the resource groups:
a) Open the Virtual Machine Pane from the home page and click on "Delete"
b) Check the boxes for the associated resources you want to delete alongside as well as other acknowledgements
c) Click on "Delete"

Wait for the deletion of the resource(s) to finish and voila!

Conclusion
Thanks for making it to the end! I hope this step-by-step guide helped you create your Windows 11 VM and you have gained some basic knowledge of some terms associated with VMs and Azure generally. Should you have any questions/feedback or want to learn more about anything here in more detail? Feel free to reach out as I'll be more than excited to engage as we share ideas and grow together in our cloud journey.